

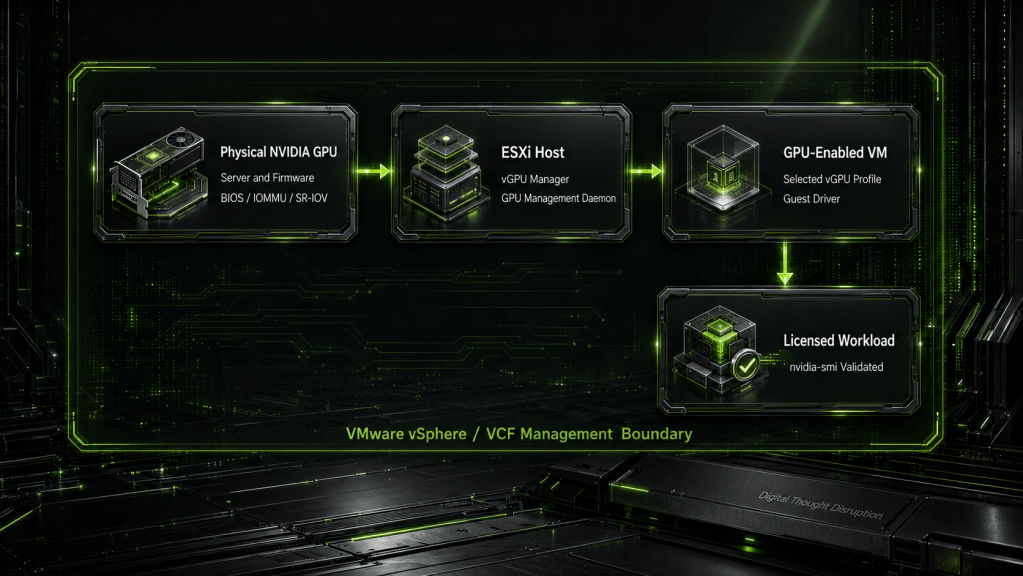


TL;DR
Deploying NVIDIA vGPU on VMware vSphere is not simply a matter of installing a driver and attaching a virtual PCI device. The server, physical GPU, ESXi build, NVIDIA vGPU release, guest operating system, vGPU profile, and licensing model must all form a supported combination.
A reliable deployment sequence is:
- Validate the complete hardware and software compatibility matrix.
- Configure the required BIOS, IOMMU, SR-IOV, and display settings.
- Install the NVIDIA vGPU Manager components on the ESXi host.
- Configure the host graphics mode as Shared Direct.
- Add an appropriate vGPU profile to a powered-off VM.
- Install the matching NVIDIA vGPU guest driver.
- Configure NVIDIA licensing.
- Validate the host, guest, workload, and vMotion path.
- Document an upgrade and rollback sequence before production use.
The most important lifecycle rule is to upgrade the ESXi-side vGPU Manager before upgrading guest drivers. A newer manager can support defined older guest-driver branches, while an older manager generally cannot support a newer guest driver.
Introduction
NVIDIA vGPU allows multiple virtual machines to share a physical GPU while retaining workload-specific graphics or compute capabilities. In a VMware vSphere or VMware Cloud Foundation environment, that can support virtual desktops, engineering applications, visualization platforms, and selected accelerated workloads without dedicating an entire physical GPU to every VM.
The operational challenge is that vGPU introduces a tightly coupled stack. The physical server, GPU firmware, ESXi build, NVIDIA host software, guest driver, profile type, licensing service, and migration destination all affect whether a VM can power on and remain supportable.
NVIDIA updated its VMware vSphere deployment guidance on March 10, 2026. The guide uses vSphere 9 as its current baseline and covers vGPU Manager installation, profile assignment, guest drivers, licensing, validation, and migration. Environments still running vSphere 8 must use the current NVIDIA support matrix and release notes to verify the exact supported ESXi update and patch level.
This walkthrough presents the deployment as a controlled migration of a conventional virtual machine into a GPU-enabled workload. It also includes the validation and recovery steps that are often omitted from basic installation guides.
Objective
The objective is to deploy NVIDIA vGPU on an existing supported ESXi host, assign a vGPU profile to a virtual machine, install the correct guest software, validate GPU access, and prove that the VM can be operated safely inside a vSphere or VCF cluster.
By the end of the walkthrough, you should have:
- A supported physical server and NVIDIA GPU combination
- A functioning NVIDIA vGPU Manager installation on ESXi
- An ESXi host configured for Shared Direct graphics
- A virtual machine with an appropriate vGPU profile
- A compatible NVIDIA vGPU guest driver
- A licensed vGPU workload
- Successful host and guest
nvidia-smivalidation - A tested vMotion and maintenance workflow
- A documented upgrade and rollback sequence
Scope and Assumptions
This walkthrough assumes:
- The ESXi host is managed by vCenter Server.
- The server and GPU appear in the applicable NVIDIA and server-vendor compatibility listings.
- A supported NVIDIA vGPU software entitlement is available.
- The ESXi host can be placed into maintenance mode and rebooted.
- The virtual machine can be powered off while the vGPU device is added.
- Alternative guest access, such as RDP, SSH, or another remote console, is available.
- vCenter, ESXi, and VCF lifecycle changes are managed through an approved change process.
- The deployment uses NVIDIA vGPU rather than PCI passthrough.
PCI passthrough, Dynamic DirectPath I/O, and unified-memory passthrough designs have different migration and lifecycle characteristics. They should not be treated as interchangeable with time-sliced NVIDIA vGPU profiles.
At the July 22, 2026 research baseline, NVIDIA vGPU 20 is the current major release branch. Current release notes support defined vSphere 9 and vSphere 8 builds, but support varies by GPU generation. Recheck the current matrix before every deployment or upgrade rather than treating this article as a permanent version contract.
Build the Compatibility Matrix Before Touching the Host
The safest approach is to build a compatibility worksheet before downloading any software.
A successful deployment depends on more than whether ESXi can detect the PCI device.
| Layer | What to validate | Why it matters |
|---|---|---|
| Physical server | Exact OEM server model, BIOS, firmware, and power support | A supported GPU installed in an unsupported chassis is not a supported vGPU platform |
| Physical GPU | Exact GPU model and generation | Profile availability, SR-IOV behavior, frame-buffer capacity, and ESXi minimums vary |
| VMware platform | ESXi, vCenter, and VCF versions and patch levels | Current vGPU releases may require specific ESXi updates |
| Host software | NVIDIA vGPU Manager release | The host component controls physical GPU virtualization |
| Guest software | NVIDIA vGPU guest-driver branch | The driver must be compatible with the host manager |
| Guest operating system | Exact Windows or Linux version | Only operating systems in the support matrix are supported |
| Profile | A-series, B-series, Q-series, and frame-buffer size | The profile determines functionality, density, and licensing |
| Licensing | NVIDIA vApps, vPC, vWS, or applicable enterprise entitlement | An unlicensed vGPU can enter reduced-capability operation |
| Migration target | Matching GPU type, profile capacity, ECC state, and software baseline | These conditions affect vMotion eligibility |
Do Not Validate Each Layer in Isolation
A common mistake is to validate the GPU against NVIDIA documentation and ESXi against Broadcom documentation independently.
The real support question is:
Does this exact server, GPU, ESXi build, vGPU Manager, guest driver, guest OS, profile, and license combination appear inside the supported intersection?
Record the result in the change request. This becomes the baseline for future troubleshooting and upgrades.
Confirm the VMware Edition and Cluster Design
The current NVIDIA release documentation identifies supported VMware licensing requirements for vGPU deployments. Confirm that the vSphere edition, vCenter configuration, and cluster capabilities required by the design are present.
Also decide whether the cluster contains:
- Identical GPU models on every participating host
- A mix of GPU models
- GPU and non-GPU hosts
- Dedicated GPU workload hosts
- Enough spare profile capacity for maintenance
- Consistent ECC configuration
- A tested vMotion network
A cluster can be technically healthy while still having no valid destination for a particular vGPU VM.
Configure the Server BIOS and Platform Firmware
BIOS settings are platform-specific, but several controls are consistently important.
Enable IOMMU Support
Enable the processor-specific IOMMU feature:
- Intel VT-d on Intel systems
- AMD-Vi or IOMMU on AMD systems
This permits the hypervisor to map PCI devices and their memory correctly into virtual-machine address spaces.
Enable SR-IOV and ARI Where Required
For NVIDIA Ampere, Ada, and Blackwell generation GPUs, current NVIDIA guidance requires the relevant SR-IOV and Alternative Routing-ID Interpretation capabilities to be enabled.
Depending on the server vendor, the settings might appear as:
- SR-IOV Global Enable
- ARI Support
- Alternative Routing-ID Interpretation
- PCIe ARI
- Virtualization Technology for Directed I/O
Turing-generation GPUs use a different architecture and should be configured according to their specific platform guidance. Do not assume every GPU generation requires identical SR-IOV behavior.
Enable Above 4G Decoding and Required MMIO Capacity
Large GPUs and large virtual machines can require substantial memory-mapped I/O space. Enable Above 4G Decoding when required by the server or GPU documentation.
Some configurations may also require additional 64-bit MMIO allocation. Apply such settings only when supported by the specific GPU profile, VM size, and VMware guidance. Blindly copying MMIO settings from a passthrough design into a vGPU design can create unnecessary configuration drift.
Keep the vGPU Device Out of the Primary Display Path
The GPU being used for vGPU should not be the host’s primary display adapter.
Use one of the following for the server console:
- The server’s baseboard management controller
- An embedded VGA adapter
- A separate low-end display adapter
This prevents the system firmware or ESXi console from claiming a GPU that must remain available to the vGPU Manager.
Update the Complete Firmware Chain
Before installing the vGPU software, align:
- Server BIOS
- Baseboard management controller firmware
- GPU firmware
- PCIe switch firmware, where applicable
- ESXi vendor add-on
- ESXi patch level
Power-cycle the server after changing low-level PCIe or SR-IOV settings. A warm reboot might not fully reset every device or firmware state.
Understand the NVIDIA vGPU Stack
The deployment has two driver layers. The ESXi-side vGPU Manager owns the physical GPU and presents profiles. The guest driver consumes the assigned profile inside the virtual machine.
The important point is that the VM does not communicate directly with an unmanaged physical PCI device. The guest driver communicates through the virtual GPU interface created by the ESXi-side vGPU Manager.
This coupling is why generic NVIDIA drivers, unsupported branch combinations, or partially upgraded clusters frequently cause VM startup and migration failures.
Prepare the ESXi Host
Schedule a maintenance window before modifying the ESXi host.
Evacuate Workloads and Enter Maintenance Mode
Confirm that no powered-on VM is using the target GPU. Then place the host into maintenance mode.
From the ESXi shell:
esxcli system maintenanceMode set --enable true
Confirm the state:
esxcli system maintenanceMode get
Expected result:
Enabled
Stage the NVIDIA Packages
Download the VMware vSphere package for the selected NVIDIA vGPU release from the NVIDIA Licensing Portal.
Current packages separate the ESXi installation into components that include:
- The NVIDIA host driver component
- The NVIDIA GPU Management daemon component
Copy the required ZIP files to a datastore or another location accessible to the ESXi host.
The filenames change between releases, so define the actual names before running the commands:
DATASTORE="datastore1"
HOST_DRIVER_ZIP="replace-with-host-driver-component.zip"
MGMT_DAEMON_ZIP="replace-with-gpu-management-daemon-component.zip"
Install the host driver:
esxcli software vib install \
  -d "/vmfs/volumes/${DATASTORE}/${HOST_DRIVER_ZIP}"
Install the GPU Management daemon:
esxcli software vib install \
  -d "/vmfs/volumes/${DATASTORE}/${MGMT_DAEMON_ZIP}"
Review the result of each command. Do not continue if ESXi reports dependency, acceptance-level, image-profile, or signature failures.
Reboot the Host
reboot
After the host returns, verify that management networking, storage, vCenter connectivity, and the expected vendor add-on remain healthy.
Validate the ESXi-Side Installation
Do not add a vGPU to a production VM until the host itself passes validation.
Confirm the NVIDIA Modules
NVIDIA module names can differ by GPU generation and software release. Check for both common names:
vmkload_mod -l | grep -E "nvidia|nvidia-gpu"
You should see the applicable NVIDIA kernel module loaded.
Confirm the GPU Management Daemon
/etc/init.d/nvdGpuMgmtDaemon status
The service should report that the daemon is running.
Confirm the Physical GPUs
Run:
nvidia-smi
The output should identify the physical GPU model, driver version, memory, temperature, and other host-level information.
Also confirm the installed packages:
esxcli software vib list | grep -i nvidia
If nvidia-smi fails on the host, stop here. Adding a profile to a VM will not solve a host-level driver, firmware, or PCIe-enumeration issue.
Configure the Host for Shared Direct Graphics
Installing the vGPU Manager does not complete the vSphere graphics configuration.
In the vSphere Client:
- Select the ESXi host.
- Open Configure.
- Select Graphics.
- Edit the host graphics settings.
- Set the graphics type to Shared Direct.
- Confirm both the configured and active graphics types.
- Reboot the host if vSphere indicates that a reboot is required.
Shared Direct tells ESXi that the physical GPU will expose NVIDIA vGPU profiles directly to virtual machines.
If the host remains in Shared mode rather than Shared Direct mode, a VM can fail to power on with an insufficient graphics-resource error even though the GPU is visible.
Prepare the Virtual Machine
The VM should be operational before the vGPU device is added.
Establish Alternative Remote Access
A vSphere console might be unavailable after an active vGPU is attached. Before changing the VM, validate at least one alternative access method:
- Remote Desktop Protocol for Windows
- SSH for Linux
- Enterprise remote-support software
- Application-specific console access
- Guest management tooling
Also confirm:
- VMware Tools is current and healthy.
- The guest network configuration is correct.
- DNS and time synchronization work.
- Administrative credentials are available.
- A recovery path exists if the guest driver fails.
Capture the Baseline
Record the current VM configuration:
- Virtual hardware version
- Guest operating-system version
- vCPU and memory
- Firmware mode
- Secure Boot state
- Existing PCI devices
- Current display configuration
- Datastore and host placement
- Application health
A powered-off configuration backup or documented settings export is more useful than relying on a snapshot as the only recovery strategy.
Power Off the VM
A vGPU profile is added while the VM is powered off.
Confirm a clean shutdown rather than forcing power off unless the guest is already unresponsive.
Select the Appropriate vGPU Profile
The correct profile is based on workload function, required frame buffer, density, display requirements, and licensing.
| Profile series | Typical workload | General licensing alignment | Design consideration |
|---|---|---|---|
| A-series | Application streaming and session-based applications | NVIDIA Virtual Applications | Optimized for application delivery and user density |
| B-series | Business virtual desktops and knowledge-worker VDI | NVIDIA vPC or applicable vWS entitlement | Balance frame buffer, displays, and desktop density |
| Q-series | Engineering, CAD, visualization, professional workstations, and supported accelerated workloads | NVIDIA RTX Virtual Workstation | Higher-end graphics features and professional application use |
Profile names typically indicate the frame-buffer allocation. A larger profile provides more dedicated GPU memory but reduces the number of VMs that can share the physical GPU.
Size from Evidence, Not Guesswork
Use the following inputs:
- Peak frame-buffer consumption
- GPU utilization
- Encoder and decoder utilization
- Display count and resolution
- Application certification
- CUDA requirements
- User concurrency
- Expected workload growth
- Required spare capacity for maintenance
Starting with the largest available profile can hide sizing problems while destroying cluster density. Starting too small can cause out-of-memory failures, application instability, or poor user experience.
Use pilot measurements to establish the smallest profile that satisfies the workload with reasonable headroom.
Distinguish Graphics vGPU from AI Compute Designs
Do not assume that every AI or CUDA workload belongs on a standard Q-series profile.
NVIDIA AI Enterprise has its own product, support, and compute-profile considerations. For VCF Private AI or other enterprise AI deployments, validate the required software edition, GPU model, workload type, and profile support rather than adapting a VDI design by name alone.
Add the vGPU Device to the VM
With the VM powered off:
- Open the VM in the vSphere Client.
- Select Edit Settings.
- Select Add New Device.
- Choose PCI Device.
- Select the required NVIDIA vGPU profile.
- Save the configuration.
- Review the VM summary for the newly assigned device.
Do not power on the VM until you have confirmed:
- The profile is supported on the physical GPU.
- The host has enough remaining profile capacity.
- The profile is compatible with the planned destination hosts.
- The correct guest driver package is ready.
- Remote access to the guest is available.
Install the NVIDIA vGPU Guest Driver
The guest must use the NVIDIA vGPU guest driver supplied for the selected vGPU software release. A general NVIDIA graphics, gaming, or data-center driver is not a substitute.
Windows Guest
Copy the Windows guest-driver package into the VM and run the installer with administrative privileges.
Complete the installation and reboot when prompted.
After reboot:
- Confirm that Device Manager shows the NVIDIA virtual GPU without a warning state.
- Open the NVIDIA Control Panel if the selected product exposes it.
- Run
nvidia-smi. - Confirm the expected vGPU profile appears.
Linux Guest
Before installing the Linux guest driver, verify:
- Supported kernel version
- Required compiler and kernel headers
- Secure Boot requirements
- Nouveau driver state
- Supported distribution release
Run the NVIDIA vGPU guest-driver installer from the matching release package. The exact filename changes by release:
sudo sh NVIDIA-Linux-x86_64--grid.run
Reboot the guest:
sudo reboot
Then validate:
nvidia-smi
If the installer builds a kernel module, preserve a tested process for rebuilding or reinstalling the module after future kernel upgrades.
Configure NVIDIA Licensing
A technically functional vGPU can still run in a reduced-capability state if it does not obtain the required license.
Current NVIDIA licensing can use a Cloud License Service or Delegated License Service, depending on the environment and entitlement.
Generate the Client Configuration Token
From the applicable NVIDIA licensing service:
- Configure the required license server instance.
- Generate a client configuration token.
- Transfer the token securely to the virtual machine.
- Protect it as a credential-bearing configuration artifact.
- Avoid embedding it into a broadly shared VM template without an approved secret-handling process.
Install the Token on Windows
Place the token in the NVIDIA client configuration directory:
%SystemDrive%\Program Files\NVIDIA Corporation\vGPU Licensing\ClientConfigToken
Restart the applicable NVIDIA services or reboot the VM.
Install the Token on Linux
Place the token in:
/etc/nvidia/ClientConfigToken/
Protect the directory and file permissions:
sudo chown root:root /etc/nvidia/ClientConfigToken/*
sudo chmod 744 /etc/nvidia/ClientConfigToken/*
Restart the licensing service:
sudo systemctl restart nvidia-gridd
Verify the License State
Run the following inside the guest:
nvidia-smi -q
Locate the licensing section and confirm that the status reports a licensed state.
Licensing validation must be performed inside the guest. Host-level nvidia-smi validates the physical GPU and host driver, not the VM’s client-license acquisition.
Validate the Complete Configuration
A VM power-on is only the first validation gate.
Host Validation
Confirm:
- NVIDIA modules are loaded.
- The GPU Management daemon is running.
- Host
nvidia-smireports every expected physical GPU. - The host graphics type is Shared Direct.
- The expected vGPU profiles appear in vSphere.
- The host has sufficient available profile capacity.
- No new PCIe, XID, or driver errors appear in ESXi logs.
Guest Validation
Inside the virtual machine, run:
nvidia-smi
Confirm:
- The expected NVIDIA vGPU device appears.
- The guest-driver version is correct.
- The assigned frame-buffer size matches the selected profile.
- No driver communication error is reported.
- GPU memory and utilization values are visible.
- The expected process list appears when the workload runs.
Run the detailed query:
nvidia-smi -q
Confirm:
- Product name
- Driver version
- License status
- Frame-buffer totals
- ECC state, where applicable
- Encoder and decoder state
- Current performance state
Workload Validation
A synthetic GPU query does not prove that the application is healthy.
Run a representative workload and measure:
- Application startup time
- GPU utilization
- Frame-buffer use
- CPU utilization
- Interactive latency
- Encoder and decoder use
- Job completion time
- Error logs
- User experience
Collect a baseline before promoting the VM into production. This makes it possible to distinguish a later application problem from a vGPU platform problem.
Validate vMotion Before Relying on It
NVIDIA vGPU supports vMotion in supported configurations, but it is not equivalent to migrating a conventional VM.
Enable vGPU Hot Migration
In vCenter Server advanced settings, confirm that the vGPU hot-migration setting is enabled:
vgpu.hotmigrate.enabled
Apply this setting according to the current NVIDIA and Broadcom guidance for the vCenter version in use.
Check the Destination Host
The destination host should have:
- The same supported physical GPU type
- A compatible NVIDIA vGPU Manager baseline
- Enough capacity for the exact profile
- Matching relevant ECC configuration
- Shared Direct graphics enabled
- A functioning vMotion network
- Compatible CPU and VM settings
- No conflicting device reservation
A destination host can have free GPU memory and still fail the compatibility check if its GPU mode or ECC state differs.
Perform a Controlled Migration Test
Start with a non-production pilot VM:
- Run
nvidia-smiand record the initial state. - Start a representative GPU workload.
- Initiate a manual vMotion.
- Measure the migration duration and application interruption.
- Confirm the VM resumes normally.
- Run
nvidia-smiagain. - Verify application health and logs.
- Migrate the VM back to prove both directions.
Record the observed stun time. A vGPU VM can have a significantly longer interruption than a conventional VM because GPU state must also be transferred.
Plan Host Maintenance Deliberately
Do not assume that placing a host into maintenance mode will automatically evacuate every vGPU VM.
Depending on the vSphere release, DRS configuration, driver level, GPU capacity, and workload state, vGPU VMs might require:
- Manual live migration
- An estimated-stun-time workflow
- A powered-off migration
- A planned guest shutdown
- Temporary workload relocation
- A maintenance exception
Recent vSphere versions include improved automation for vGPU maintenance workflows, but it remains dependent on cluster configuration and destination capacity.
For production, define two paths:
Preferred path: Tested vMotion to a compatible GPU host.
Fallback path: Graceful guest shutdown followed by cold migration or restart on a validated destination.
Do not begin a VCF or ESXi lifecycle operation until every vGPU workload has a known evacuation path.
Use the Correct Driver Upgrade Order
The host and guest software must be upgraded in the correct sequence.
NVIDIA compatibility rules generally permit a newer vGPU Manager to support defined guest drivers from the immediately preceding supported branch. The reverse direction is not supported: a newer guest driver should not be installed while the host remains on an older incompatible manager.
Use this sequence:
Recommended Cluster Upgrade Process
| Stage | Action | Exit criterion |
|---|---|---|
| Compatibility | Confirm target ESXi, GPU, manager, guest, and OS support | Approved target matrix |
| Capacity | Reserve a compatible destination host | Workloads have an evacuation path |
| Host pilot | Upgrade one ESXi host | Host nvidia-smi and daemon validation pass |
| Guest pilot | Upgrade one representative VM | Guest, license, application, and vMotion tests pass |
| Cluster rollout | Upgrade remaining hosts in controlled waves | Every host returns healthy |
| Guest rollout | Upgrade remaining guest drivers | No unsupported branch combinations remain |
| Closure | Update CMDB, runbooks, and evidence | Operational baseline recorded |
VMware Cloud Foundation Lifecycle Considerations
In a VCF environment, treat NVIDIA vGPU components as part of the complete ESXi image and lifecycle dependency set.
Before applying a VCF update:
- Confirm the target ESXi version is supported by the selected NVIDIA branch.
- Confirm the desired image or vendor add-on workflow preserves the required NVIDIA components.
- Check whether a replacement vGPU package is needed after the ESXi update.
- Validate SDDC Manager prechecks.
- Confirm powered-off recovery capacity.
- Test on a representative host before changing the cluster.
Do not allow the ESXi lifecycle process and the NVIDIA driver lifecycle process to operate as independent change streams.
Troubleshoot Profile and VM Startup Failures
| Symptom | Likely cause | What to check |
|---|---|---|
| No vGPU profiles appear | Unsupported GPU, missing manager, failed daemon, or incorrect graphics mode | Host driver, daemon status, support matrix, and Shared Direct |
| VM reports insufficient graphics resources | Profile capacity exhausted or graphics mode incorrect | Active and configured graphics type, profile allocations, and destination capacity |
Host nvidia-smi fails |
Driver not loaded, firmware issue, PCIe enumeration problem, or daemon failure | Kernel modules, BIOS, firmware, ESXi logs, and installed packages |
Guest nvidia-smi cannot communicate with driver |
Wrong guest package or incompatible host and guest branches | Manager version, guest-driver version, and guest kernel |
| VM starts but GPU performance is restricted | Licensing failure or wrong entitlement | Client token, licensing-service reachability, and nvidia-smi -q |
| vMotion reports insufficient resources | No matching profile capacity, GPU mismatch, or ECC mismatch | Physical GPU type, available profile, ECC state, and host baseline |
| VM console becomes unavailable | Expected behavior with an active vGPU in some configurations | Use validated RDP, SSH, or remote-management access |
| GPU appears as an unexpected number of devices | Incorrect SR-IOV or platform firmware configuration | BIOS SR-IOV settings and GPU-specific known issues |
| Large VM cannot power on | Insufficient MMIO space or large-BAR requirements | VM memory, firmware mode, MMIO guidance, and GPU profile |
| VM fails after a host upgrade | NVIDIA components removed or incompatible | Desired image contents, VIB list, module state, and release compatibility |
Check the Right Logs
Useful evidence includes:
nvidia-smi
nvidia-smi -q
vmkload_mod -l | grep -E "nvidia|nvidia-gpu"
/etc/init.d/nvdGpuMgmtDaemon status
esxcli software vib list | grep -i nvidia
Review:
- ESXi
vmkernel.log - VM
vmware.log - NVIDIA daemon status
- Windows Event Viewer
- Linux kernel and system journals
- NVIDIA licensing-service logs
- vCenter task and event history
Capture the exact VM power-on or vMotion error. General descriptions such as “the GPU is not working” remove the evidence needed to distinguish capacity, driver, firmware, profile, and licensing failures.
Rollback and Recovery
A production deployment needs a rollback plan for both the VM and the ESXi host.
VM Rollback
If the guest cannot start or the driver fails:
- Power off the VM.
- Remove the assigned vGPU PCI device.
- Confirm a standard virtual display adapter remains available.
- Power on the VM without the vGPU.
- Remove or roll back the guest driver if required.
- Restore remote access and application service.
- Investigate the host and compatibility baseline before reattaching the profile.
Do not repeatedly power-cycle a failing production VM without collecting the initial error and logs.
Host Rollback
Before upgrading, retain the previously approved NVIDIA host-driver and daemon packages.
If the new host software fails:
- Evacuate or power off GPU workloads.
- Enter maintenance mode.
- Remove or replace the failed NVIDIA components using the supported package procedure.
- Install the previous compatible host components.
- Reboot the host.
- Validate modules, daemon, physical GPUs, and profiles.
- Test a pilot VM before returning the host to production.
Migration Fallback
If vMotion fails:
- Do not bypass compatibility checks.
- Confirm the destination hardware and ECC state.
- Gracefully shut down the VM.
- Perform a cold migration or restart on a validated host.
- Confirm licensing and application health after startup.
A powered-off migration path is not as convenient as vMotion, but it is a valid recovery boundary when it has been planned and tested.
Operational Handoff and Next Steps
Before declaring the deployment complete, record:
- Server model and firmware baseline
- Physical GPU model and mode
- ESXi and vCenter versions
- VCF version, if applicable
- NVIDIA vGPU Manager version
- Guest-driver versions
- Guest operating systems
- Assigned profiles
- Licensing service and entitlement
- Client-token deployment method
- Host and guest validation evidence
- vMotion test result and observed interruption
- Maintenance fallback procedure
- Upgrade and rollback packages
- Support contract and escalation path
The operational team should be able to answer three questions without rediscovering the environment:
- Which profile can this workload use?
- Which hosts can run or receive this VM?
- Which host and guest driver combinations are supported?
Conclusion
A reliable NVIDIA vGPU deployment depends on controlling the full dependency chain, not merely getting a VM to recognize a GPU.
The implementation should begin with the compatibility matrix, BIOS and firmware readiness, and cluster-capacity design. The ESXi-side vGPU Manager must then be installed and validated before the host is configured for Shared Direct graphics and a profile is assigned to the VM.
Guest-driver installation, licensing, nvidia-smi validation, application testing, and vMotion testing are separate gates. Passing one does not prove that the others are ready for production.
The same discipline applies to lifecycle management. Upgrade the host manager before the guest drivers, preserve a compatible rollback package, and never enter an ESXi or VCF maintenance window without a tested evacuation path for every vGPU workload.
