

The complexities of managing and deploying ML infrastructure continue to grow and can indeed be daunting. Some time ago, we shared “A Step-by-step Guide To Setting Up MLflow On The Google Cloud Platform,” which was well-received. However, as time has passed, advancements in technology have offered us the potential to simplify and automate this process further.
And this is where Terraform comes into play. As a robust Infrastructure as Code (IaC) tool, Terraform enables automation, significantly streamlining your ML infrastructure management.
In this step-by-step guide, we’ll demonstrate how to seamlessly set up MLFlow on the Google Cloud Platform using Terraform, further optimizing the process and incorporating additional automation and scalability into your machine learning infrastructure.
Whether you are already leveraging MLFlow’s capabilities to optimize machine learning experiments or just starting to navigate its potential, this guide will deliver a step-by-step tutorial to augment your work.
What is Terraform?
Before delving into the specifics of utilizing Terraform for our ML infrastructure management, let’s start with an explanation of what Terraform is.
Terraform is an open-source Infrastructure as Code (IaC) software tool created by HashiCorp. It allows developers to define and provide data center infrastructure using a declarative configuration language. Simply articulate your infrastructure’s desired state, and Terraform devises the strategy to achieve that state.
This capability proves especially beneficial in our focus: setting up MLflow on the Google Cloud Platform. It automates and streamlines the provisioning and management process.
Moreover, the platform-independent nature of Terraform allows it to work with any cloud provider, ensuring its utility in managing resources across diverse environments.
5 Key Advantages of Terraform
In any technology-driven process, tool selection is a key determinant of efficiency and success. After thoroughly evaluating a wide array of options, we concluded that Terraform indeed stands out. But what exactly drove us towards Terraform? Let’s investigate the specific benefits this tool provides:
- Code Reusability: Terraform’s code can be effortlessly repurposed for future needs, streamlining your work processes.
- Accountability: The code is readily reviewable, promoting transparency and facilitating error detection and problem-solving.
- Simplified Management: The unique Infrastructure as Code (IaC) approach eliminates complicated manual processes, making infrastructure management significantly easier.
- Reduced Provisioning Time: Terraform speeds up the setup process, enabling faster deployment and boosting overall productivity.
- Easier Drift Management: With Terraform, deviations from your desired infrastructure state can be easily detected and rectified, simplifying the often complex task of drift management.
Link to Repository
For your convenience and reference, we have prepared a dedicated repository that houses all the necessary resources related to this guide.
If you encounter any issues or require additional clarity, we recommend using this repository.
Resources
- CloudSQL – database
- Bucket – storing MlFlow artifacts
- Artifact Registry – keeping docker image
- Secret Manager – keeping passwords
- CloudRun – running MlFlow container
- Service Accounts – for limiting privileges
13 Key Steps to Setting Up MLflow on Google Cloud Platform using Terraform
Step 1: Setting Up Terraform
- Install Terraform – link to the official documentation
- Install terraform-docs for automatic documentation (optional) terraform-docs
Step 2: Activating Needed APIs
To kickstart this project, it’s essential to activate the following APIs. Please be aware that the activation process for some of them might take up to 24 hours.
Step 3: Setup GCP
- Install gcloud CLI: https://cloud.google.com/sdk/docs/install
- Log into gcloud using gcloud auth application-default login
Step 4: Creating Bucket for Terraform Status
Bucket must be created to store Terraform’s status. While it’s feasible to maintain the status locally, it’s not advised due to potential issues with data integrity and reliability.
- From the Google Cloud menu, choose Cloud Storage -> Bucket -> Create Bucket
 And then:
 - Fill in the bucket data (on the screen, you can see sample data). Consider choosing ‘Multiregion location type’ if your project needs higher availability. You can adjust other options as required.
Step 5: Start Working with Terraform
If you need more detailed information about specific resources, the Terraform documentation serves as an excellent resource.
- Create a main.tf file, which will hold the basic configuration. Make sure to insert the latest version of the AWS provider.
terraform { required_providers { google = { source = "hashicorp/google" version = "4.58.0" } } backend "gcs" { bucket = "your bucket name" prefix = "terraform/state" } } provider "google" { region = "your region" project = "your project name" } - Navigate to your Terraform directory and type Terraform. This command will initialize Terraform, download all required providers, and establish a connection with your state bucket.
You should see an output similar to the following:/projects/mlflow-gcp/terraform$ terraform init Initializing the backend... Successfully configured the backend "gcs"! Terraform will automatically use this backend unless the backend configuration changes. Initializing provider plugins... - Finding hashicorp/google versions matching "4.58.0"... - Finding latest version of hashicorp/random... - Installing hashicorp/google v4.58.0... - Installed hashicorp/google v4.58.0 (signed by HashiCorp) - Installing hashicorp/random v3.5.1... - Installed hashicorp/random v3.5.1 (signed by HashiCorp) Terraform has created a lock file .terraform.lock.hcl to record the provider selections it made above. Include this file in your version control repository so that Terraform can guarantee to make the same selections by default when you run "terraform init" in the future. - You should now be able to see a Terraform folder in your bucket:
Step 6: Inputting Variables for the Project
Before we can commence the creation of resources, we must input specific project variables. These should be created in the variables.tf file.
- Env – depending on where the project will be used test/staging/prod.
variable "env" { default = "prod" description = "Name of the environment" } - The full name of the project can be found here:
variable "project_name" { default = "test-ml-flow-terraform" description = "Full name of the project" } - VPN for database – if you’re using a VPN, it would be a good idea to input it in this variable as it adds an additional layer of security.
variable "vpn_to_access_db" { default = "0.0.0.0/0" description = "VPN that will be used to connect to DB, while using 0.0.0.0/0 the application will be available from any IP (it will be accessible from the internet)." } - Region that will be used throughout your project.
variable "region" { default = "europe-west2" description = "GCP region that will be used for the project" } - Docker image – after pushing your image to the container registry, the link to the image needs to be put here.
variable "image_name" { default = "mlflow-imagine" description = "Name of the imagine that will be used." } - Bucket users list – input all the users that need to be able to see objects in the bucket. You need to put “user:” before the email if the email belongs to a user, and “serviceAccount:” if it belongs to a service account.
variable "bucket_users_list" {
  default     = ["user:user_email2@gmail.com", "user:user_email2@gmail.com"]
  description = "List of users "
}
Step 7: Creating Artifact Registry file
Create a registry using Terraform. For this purpose, you’ll need to establish a file titled artifact_registry.tf:
resource "google_artifact_registry_repository" "ar_mlflow" {
  location      = var.region
  repository_id = "${var.project_name}-repo"
  description   = "Docker repository for MlFlow"
  format        = "DOCKER"
}
Create repository, using command:
terraform apply -target="google_artifact_registry_repository.ar_mlflow
To use it to spin a *Cloud Run* deployment, you need to build, tag, and push a Docker image to the *Artifact Registry*.
Ensure you have a recent version of Docker installed. You can follow the installation instructions from the official Docker documentation.
The Docker images are set to be pushed to the Artifact Registry within your GCP project.
You need to change project id and region in the commands for the ones you are using. If you have any problems with artifact registry refer to the official documentation
Ensure you change the project id and region in the commands to match the ones you are using. If you encounter any issues with the Artifact Registry, please refer to the official documentation.
To set up Docker authentication, you only need to do it once:
Setup *docker* auth once:
gcloud auth configure-docker europe-west2-docker.pkg.dev
build imagine :
docker build -t mlflow-gcp .
tag :
docker tag mlflow-gcp europe-west2-docker.pkg.dev/test-ml-flow-terraform/test-ml-flow-terraform-repo/mlflow-imagine:latest
and push :
docker push europe-west2-docker.pkg.dev/test-ml-flow-terraform/test-ml-flow-terraform-repo/mlflow-imagine:latest
Step 8: Creating a Database Instance
- First, we need to create an instance that will then hold our database (a new .tf file for the database should be created).
-
- The version used is PostgreSQL 14 (the latest available currently), minimal configuration for this version is 1 CPU and 3.75GB RAM, so a custom tier needs to be created (read more about creating custom tiers here).
- The instance needs to have some IP, so either use ipv4_enabled or create a private network if that is a better option for you.
data "google_project" "project" {
  project_id = var.project_name
}

resource "google_sql_database_instance" "main" {
  name             = "${var.project_name}-${var.env}-db"
  database_version = "POSTGRES_14"
  project          = var.project_name

  settings {
    tier            = "db-custom-1-3840" # vCPUs: 1 Memory: 3.75 GB
    disk_size       = "10"               # HDD storage: 10 GB
    disk_type       = "PD_HDD"
    disk_autoresize = false
    ip_configuration {
      ipv4_enabled  = true
      authorized_networks {
        name  = "Your VPN"
        value = var.vpn_to_access_db
      }
    }
  }
}
Use the command Terraform plan. If there are no issues, execute Terraform apply. Be aware that creating database instances may take anywhere from 5 to 20 minutes.
It should look like this:

-
- Once the instance is up and ready, we can create the database. It will attach to the instance we created previously.
resource "google_sql_database" "ml_flow_db" { name = "mlflow-${var.project_name}-${var.env}" instance = google_sql_database_instance.main.name project = var.project_name } - The next step is to create a user. The password is created using random_password resource to generate random symbols for you. The login, password, and database URL are added to secrets, as they will be needed later.
resource "google_sql_user" "ml_flow_user" {
  name     = "mlflow-${var.project_name}-${var.env}"
  instance = google_sql_database_instance.main.name
  password = random_password.db_password_ml_flow.result
  project  = var.project_name
}
Creating a secret that will hold the login:
resource "google_secret_manager_secret" "db_login_ml_flow" {
  secret_id = "mlflow_tracking_username"
  project   = var.project_name
  replication {
    automatic = true
  }
}

resource "google_secret_manager_secret_version" "ml-flow-username-version-basic" {
  secret      = google_secret_manager_secret.db_login_ml_flow.id
  secret_data = google_sql_user.ml_flow_user.name
}
Creating a password and secret that will hold the password:
resource "random_password" "db_password_ml_flow" {
  length           = 16
  special          = true
  override_special = "!#$%&*()-_=+[]{}<>:?"
}

resource "google_secret_manager_secret" "db_password_ml_flow" {
  secret_id = "mlflow_tracking_password"
  project   = var.project_name
  replication {
    automatic = true
  }
}

resource "google_secret_manager_secret_version" "ml-flow-pass-version-basic" {
  secret      = google_secret_manager_secret.db_password_ml_flow.id
  secret_data = random_password.db_password_ml_flow.result
}
Creating a secret with a database connection link that we will use later:
resource "google_secret_manager_secret" "mlflow_database_url" {
  secret_id = "mlflow_database_url"
  project   = var.project_name
  replication {
    automatic = true
  }
}

resource "google_secret_manager_secret_version" "mlflow_database_url-version-basic" {
  secret      = google_secret_manager_secret.mlflow_database_url.id
  secret_data = "postgresql+psycopg2://${google_sql_user.ml_flow_user.name}:${random_password.db_password_ml_flow.result}@/${google_sql_database.ml_flow_db.name}?host=/cloudsql/${google_sql_database_instance.main.connection_name}"
}
Use a Terraform plan and then Terraform apply.

Step 9: Creating Service Accounts for CloudRun and MLflow
Next, we have two service accounts to create, one with CloudRun and the second to connect to MLflow. We will assign the rights to them in a separate file (a new .tf file for service accounts should be created).
- For CloudRun – it will only be used by CloudRun:
resource "google_service_account" "cloudrun-mlflow" { account_id = "cloudrun-mlflow-${var.env}" display_name = "Service Account for Cloud Run running ML Flow" } - For connecting to MLflow and creating objects in Bucket, you will need the key to connect to the MLflow using a script.
resource "google_service_account" "bucket_object_creator" {
  account_id   = "mlflow-connect-${var.env}"
  display_name = "Service Account for create objects in ML Flow bucket."
}

resource "google_service_account_key" "key_to_bucket_object_creator" {
  service_account_id = google_service_account.bucket_object_creator.name
}

resource "google_secret_manager_secret" "bucket_object_creator_account_key" {
  secret_id = "mlflow_service_account_key"
  project   = var.project_name
  replication {
    automatic = true
  }
}

resource "google_secret_manager_secret_version" "mlflow_key-version-basic" {
  secret      = google_secret_manager_secret.bucket_object_creator_account_key.id
  secret_data = base64decode(google_service_account_key.key_to_bucket_object_creator.private_key)
}
After Terraform plan and Terraform apply, you should be able to see two new service accounts; one should have a key.

Step 10: Creating Storage Bucket for MLflow Artifacts
At this point, we will be creating a storage bucket for our MLflow artifacts, the bucket is created as regional, but if you need higher availability, then you can use other types (a new .tf file for the bucket should be created).
resource "google_storage_bucket" "mlflow_artifacts_bucket" {
  name                        = "${var.project_name}-mlflow-${var.env}-${var.region}"
  project                     = var.project_name
  location                    = "EUROPE-WEST2"
  storage_class               = "REGIONAL"
  uniform_bucket_level_access = true
  public_access_prevention    = "enforced"
  force_destroy               = false
}
Bucket url needs to be inserted into the secret as we will need it later.
resource "google_secret_manager_secret" "mlflow_artifact_url" {
  secret_id = "mlflow_artifact_url"
  project   = var.project_name
  replication {
    automatic = true
  }
}

resource "google_secret_manager_secret_version" "ml-flow-artifact-url-version-basic" {
  secret      = google_secret_manager_secret.mlflow_artifact_url.id
  secret_data = google_storage_bucket.mlflow_artifacts_bucket.url
}
Step 11: IAM Configuration
- Add rights to the CloudRun service account (created earlier) to be able to connect to the database (new .tf file for IAM policies should be created).
resource "google_project_iam_member" "cloudsql_connect" { project = var.project_name role = "roles/cloudsql.client" member = "serviceAccount:${google_service_account.cloudrun-mlflow.email}" } - Add rights to the CloudRun service account, so it can read secrets.
resource "google_secret_manager_secret_iam_member" "db_login_ml_flow_accessor" {
  secret_id = google_secret_manager_secret.db_login_ml_flow.id
  role      = "roles/secretmanager.secretAccessor"
  member    = "serviceAccount:${google_service_account.cloudrun-mlflow.email}"
}

resource "google_secret_manager_secret_iam_member" "db_password_ml_flow_accessor" {
  secret_id = google_secret_manager_secret.db_password_ml_flow.id
  role      = "roles/secretmanager.secretAccessor"
  member    = "serviceAccount:${google_service_account.cloudrun-mlflow.email}"
}

resource "google_secret_manager_secret_iam_member" "mlflow_artifact_url_accessor" {
  secret_id = google_secret_manager_secret.mlflow_artifact_url.id
  role      = "roles/secretmanager.secretAccessor"
  member    = "serviceAccount:${google_service_account.cloudrun-mlflow.email}"
}

resource "google_secret_manager_secret_iam_member" "mlflow_database_url_accessor" {
  secret_id = google_secret_manager_secret.mlflow_database_url.id
  role      = "roles/secretmanager.secretAccessor"
  member    = "serviceAccount:${google_service_account.cloudrun-mlflow.email}"
}
All secrets should look like this:

- Create a policy for the bucket for your team to be able to look at the objects, and for the service account to create the objects.
data "google_iam_policy" "mlflow-bucket-policy" {
  binding {
    role    = "roles/storage.objectViewer"
    members = concat(var.bucket_users_list, ["serviceAccount:${google_service_account.cloudrun-mlflow.email}"])
  }
  binding {
    role = "roles/storage.objectCreator"
    members = [
      "serviceAccount:${google_service_account.bucket_object_creator.email}",
    ]
  }
}

resource "google_storage_bucket_iam_policy" "policy_bucket_object_create" {
  bucket      = google_storage_bucket.mlflow_artifacts_bucket.name
  policy_data = data.google_iam_policy.mlflow-bucket-policy.policy_data

  depends_on = [google_service_account.cloudrun-mlflow, google_storage_bucket.mlflow_artifacts_bucket]
}
You should be able to see these permissions in the bucket:
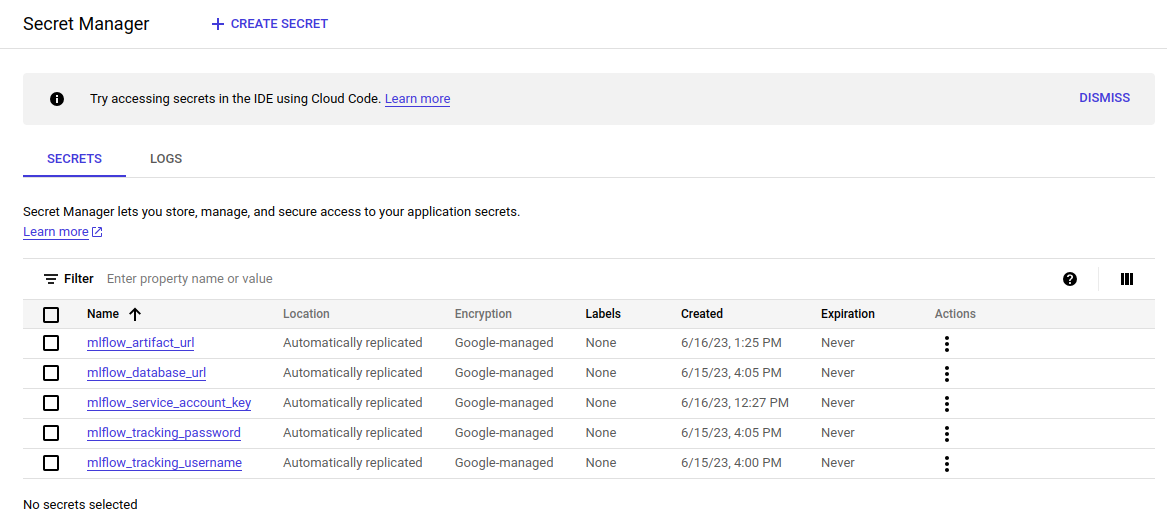
Step 12: Accessing Secret Manager
If everything was done correctly, you should see this:
Step 13: Cloud Run Configuration
This resource will be the most complex of all. Here is the full resource (a new .tf file for cloud run should be created):
- template/service_account – the service account that Terraform will use
- template/volumes – tells CloudRun that it needs to connect to the database
- template/containers – holds information on what container should be used; you can also declare env values for the container here:
data "google_project" "project" {
  project_id = var.project_name
}

resource "google_cloud_run_v2_service" "mlflow_on_cloudrun" {
  name     = "mlflow-${var.project_name}-${var.env}"
  location = var.region
  ingress  = "INGRESS_TRAFFIC_ALL"
  client   = "cloud-console"

  depends_on = [google_service_account.cloudrun-mlflow, google_artifact_registry_repository.ar_mlflow]

  template {
    service_account = google_service_account.cloudrun-mlflow.email
    volumes {
      name = "cloudsql"

      cloud_sql_instance {
        instances = [
          google_sql_database_instance.main.connection_name,
        ]
      }
    }
    scaling {
      max_instance_count = 10
    }
    containers {
      image = "${var.region}-docker.pkg.dev/${var.project_name}/${google_artifact_registry_repository.ar_mlflow.name}/${var.image_name}:latest"
      env {
        name  = "GCP_PROJECT"
        value = data.google_project.project.number
      }
      volume_mounts {
        mount_path = "/cloudsql"
        name       = "cloudsql"
      }

      resources {
        cpu_idle = true
        limits = {
          cpu    = "1000m" # 1 vCPU
          memory = "1024Mi"
        }
      }
    }
  }
}
This part of the code lets everyone access the link to the MLflow, which is then secured by the login and password.
resource "google_cloud_run_service_iam_binding" "access_to_mlflow" {
  location = google_cloud_run_v2_service.mlflow_on_cloudrun.location
  service  = google_cloud_run_v2_service.mlflow_on_cloudrun.name
  role     = "roles/run.invoker"
  members = [
    "allUsers"
  ]
}
If you plan on uploading sensitive data to the MLflow, I suggest adding another security layer.
Conclusion
And with that, we have reached the end of this guide. I hope that you found this tutorial insightful and beneficial.
As you can see, setting up MLflow on GCP using Terraform brings about enhanced automation and streamlining of ML infrastructure. But Terraform offers more than just automation – it also provides key benefits like code reusability, simplified management, and reduced provisioning time, all of which are vital in a fast-paced ML environment.
As machine learning advances, staying informed and adaptable to emerging trends and technologies is crucial. If you found this guide helpful, consider subscribing to our newsletter. We plan to publish more insightful tutorials that could significantly enhance the efficiency of your work.
Fill in the bucket data (on the screen, you can see sample data). Consider choosing ‘Multiregion location type’ if your project needs higher availability. You can adjust other options as required.