


If you have replaced a Wi-Fi router before, such as when you moved from an ISP-supplied gateway to a retail Wi-Fi router, you already know how tedious the process can be.
Swapping one Wi-Fi router for another can be a pain if you have to reconnect existing Wi-Fi devices, especially those without a screen or a keypad (cameras, printers, or media streaming sticks) to the new network. But that pain can be avoided. The trick is to make the replacement Wi-Fi router (or the primary unit of a Wi-Fi system) replicate the network settings of the one it replaces.
Ready to replace your current router? This post will come in handy.
Let’s dig in!
Dong’s note: I first published this post on December 30, 2023, and updated it on July 10, 2026, with the latest information.

Wi-Fi router swapping: The key is to make a new device replicate the current network settings
For this website alone, I test at least a few Wi-Fi routers or access points each month and use a few dozen devices of various types and Wi-Fi standards. If I had to reconnect all of them for each review, I wouldn’t have time to run any real tests — getting these devices automatically reconnected to any new access point, or Wi-Fi router I evaluate, is a time-saving necessity.
That said, I’ve effectively replaced hundreds of routers. It’s part of my job.
With that street cred, I’d say that in most cases, reusing the Wi-Fi network name and password on the new router is all you need for a smooth transition from one router to another.
However, depending on the situation, there might be more you’d want to pay attention to. I’ll try to cover everything. In most cases, the first step is to determine which settings you currently have on the existing network.
1. Gather the settings of the existing router
It’s important to take care of this step before moving to a new router: collect the information about your existing network.
That generally means three items:
- Wi-Fi settings: These include the Wi-Fi network names (SSIDs) and their corresponding passwords, as well as the authentication method. You may have just one Wi-Fi network or several for guests, IoT, and other purposes.
- Local network settings: This refers to the configuration of your current router, which in turn determines your local network settings. This configuration can include a lot of information or be simple, depending on your current network. That said, here’s the list in order of popularity.
- The router’s Default Gateway IP address.
- The IP Pool.
- Specific device-based settings, such as the current IP reservation lists, port forwarding, or MAC address filtering.
- Back up the router’s settings to a file. This step is generally a good measure if you want to reuse the old router at some point, or when you move to a new router that supports same-brand restoration, as mentioned below in step #3.
Let’s take a closer look at the first two.
Notes on Wi-Fi settings
Of the three above, #1 (Wi-Fi settings) is the most important, as it allows existing Wi-Fi clients to connect automatically. It’s also the easiest to gather, as you only need to write them down via the info on a connected client without needing to access the router’s web user interface.
In this case, make sure you do so precisely: both the Wi-Fi network name (a.k.a. SSID) and password are case-sensitive.

Note that the settings should remain the same as those of the previous router when swapping or replacing it. All of this information can be viewed in a connected client, or in the router’s web user interface (or mobile app).
If you only care about Internet access, the Wi-Fi settings are all you need to transfer from your old router to the new one.
Tips
When it comes to passwords, it’s always about keeping them a secret. Complexity is not always a positive attribute. The goal is to create a password that is both difficult to guess and easy to remember and use.
A Wi-Fi password that includes letters, numbers, uppercase and lowercase, and special characters can be a real pain, especially when you need to enter it into an IoT device, such as a printer or a media streamer — even a modern one like the Fire TV.
Generally, when it comes to Wi-Fi, it’s best to use a digit-only password. Here’s a way to make a password effective and easy to remember:
Pick an eight-word-or-longer phrase and use each word’s letter count to form the password.
If you use the previous sentence, the password would be 422063345652438 — use a different phrase for yourself. If you think you can’t remember the password, write that sentence down instead of the password itself.
Notes on network settings
The local network settings (#2) are necessary only if you want to keep your clients’ IP addresses intact or at least on the same subnet, which is crucial if you have clients that use static IP addresses.
| Friendly URL (Internet connection required) |
Default IP (a.k.a Default Gateway IP) |
Username (no quotes) |
Password (no quotes) |
|
| Asus | http://www.asusrouter.com | 192.168.50.1 or 192.168.1.1 |
“admin” | User-created during initial setup |
| AT&T Gateway | n/a | 192.168.1.254 | n/a | Access code printed on the hardware unit |
| Comcast (Xfinity) Gateway |
n/a | 10.0.0.1 or 10.1.10.1 |
“admin”, “cusadmin” |
User-created during initial setup |
| D-Link | http://dlinkrouter.local | 192.168.0.1 or 192.168.1.1 or 192.168.200.1 |
n/a | “admin” or printed on the hardware’s underside |
| MSI | http://msirouter.login | 192.168.10.1 | “admin” | varies (printed on hardware) |
| Netgear | http://routerlogin.com | 192.168.1.1 or 10.168.168.1 |
admin | User-created during initial setup |
| Linksys | http://myrouter.local | 192.168.0.1 or 192.168.1.1 |
n/a | “admin” (must be changed during the initial setup process) |
| TP-Link | http://tplinkwifi.net | 192.168.0.1 | “admin” | |
| Ubiquiti (UniFi console) |
https://unifi.ui.com | 192.168.1.1 | User-created during initial setup | |
| Most Cable Modems | N/A | 192.168.100.1 | n/a | “admin”, “password”, “default” |
In this case, you’ll need to log in to the router’s web user interface by entering its IP address in a web browser (such as Chrome, Edge, or Firefox), and note down the specific settings.
After that, note the router’s current LAN IP address (often called the Default Gateway address). This address determines the range of the IP pool.
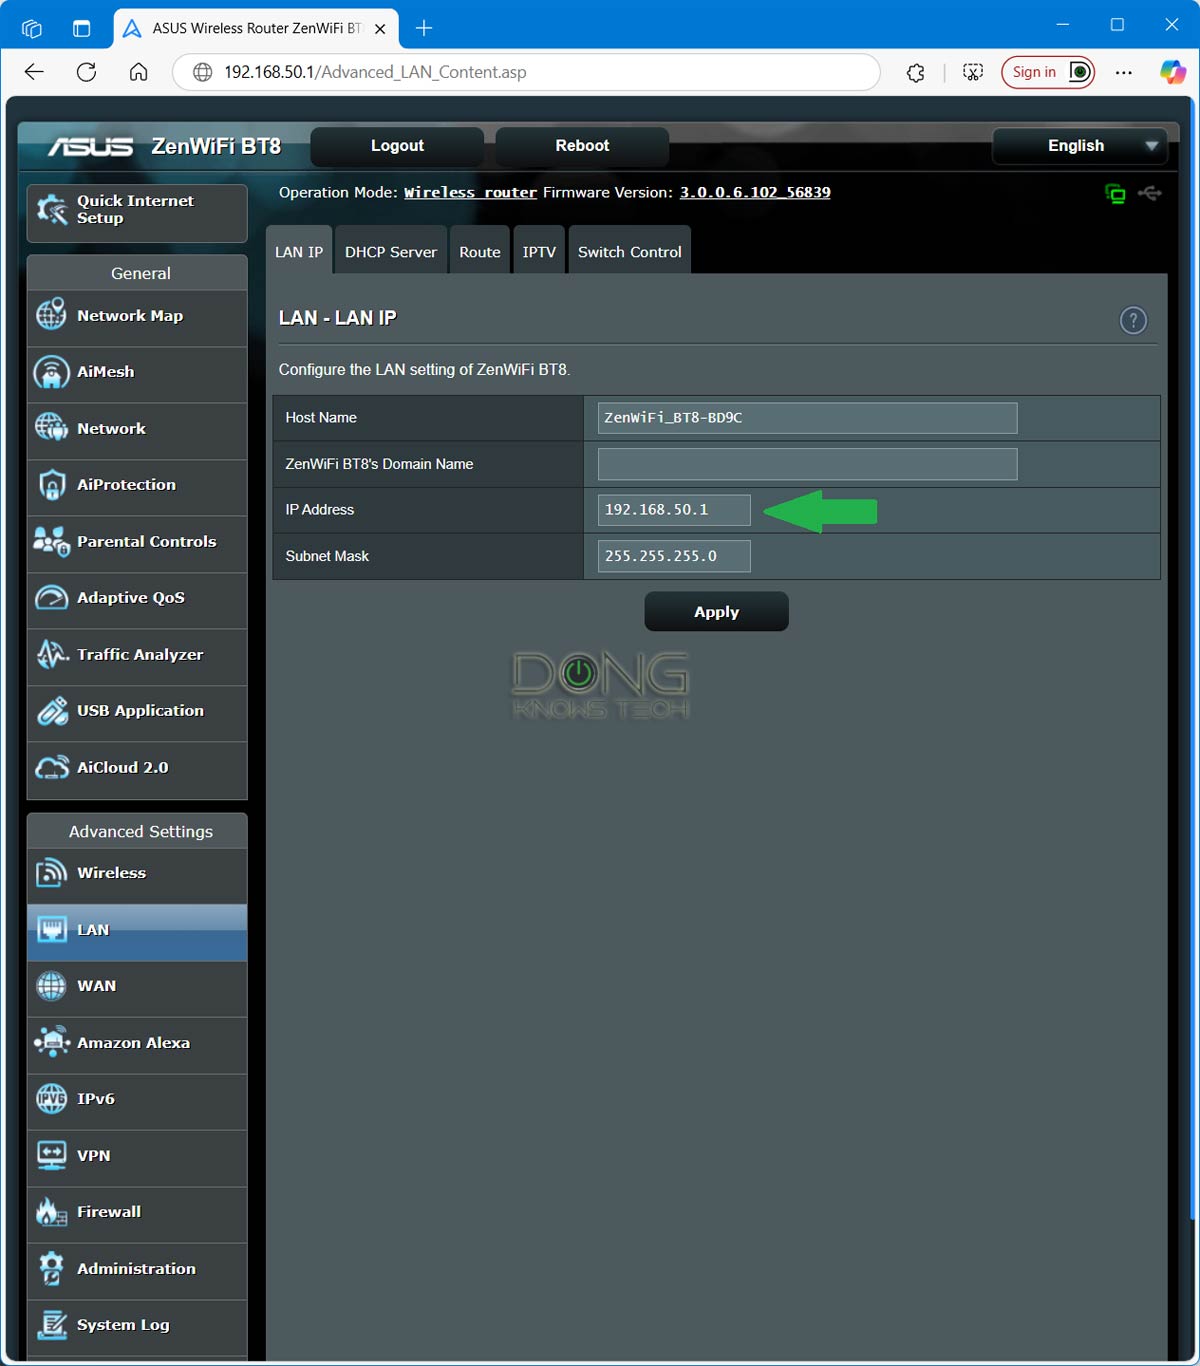

Additionally, if you have entries for IP reservations, port forwarding, or MAC filtering, note them down. If you have special features such as VPN or Dynamic DNS, note the information and disconnect those from the router.
Once you’ve completed all the above steps, it’s now time to configure the new router. The gist is to port the old router’s settings onto the replacement router.
2. Apply the settings to the replacement router
On the new router, program it with the information you’ve gathered above. Different router brands typically have distinct web user interfaces or mobile apps, but the underlying concept remains the same.
Apply LAN IP, IP Pool, and Wi-Fi settings
The first step is to set the new router’s LAN IP address to match the old router’s. After that, make sure its IP pool is also the same or larger.
After that, its Wi-Fi network will be the same as the previous router’s, too. And that means:
- The same Wi-Fi network name (SSID) and the same password. Again, note that both are case-sensitive.
- The same authentication method and channel width. When in doubt or if there’s no option, select “Auto” for both.
After that, if you’re upgrading from a previous Wi-Fi standard to Wi-Fi 7, there are a few extra steps.
Tips on moving to Wi-Fi 7
Upgrading to a Wi-Fi 7 router can be problematic. The older your current router is, the more complicated it may become, since your devices are likely outdated as well.
Wi-Fi 7 features a new Multi-Link Operation (MLO) capability. When turned on, often the default option, the router now always uses the highest Authentication Method. Consequently, its main (primary) Wi-Fi SSID(s) will not work with many legacy devices, including many Wi-Fi 5 devices and all Wi-Fi 4 and older devices.

That said, keep the following two scenarios in mind:
- If you use a single router or a mesh with wired backhaul: Turn MLO off — in many cases, that means you don’t select the default option to keep it on during the initial setup process. Now, you can apply compatibility settings to the new router’s SSIDs.
- If you want to use MLO: Create a new SSID with this feature. After that, use additional (virtual) SSIDs (such as IoT or Guest Wi-Fi) to replicate those of your old router, including the lower security requirements. Most Wi-Fi 7 routers support multiple virtual SSIDs for backward compatibility.
The point is that the default settings of many Wi-Fi 7 routers can be incompatible with legacy devices, and this is also the case for any MLO-enabled SSID.
Apply special local network settings
Finally, when necessary, manually enter the IP reservation entries, as well as those for port forwarding and MAC filtering. Alternatively, you can also reprogram these once the devices are reconnected.
Finally, when applicable, manually enter the entries for IP reservations, port forwarding, or MAC filtering. After that, program the new route with the same VPN and Dynamic DNS settings.
Now you can keep the old router as a backup or, if there’s no need for it at all, reset it to its factory default settings before giving it away, selling it, or recycling it to avoid inevitable conflicts that may occur if the old router is plugged in again, even at a different location.
3. Router-to-router setting restoration via backup file
Certain router brands allow users a much easier way to move from one router to another. Examples include those from ASUS’s AiMesh and Ubiquiti’s UniFi families.
Specifically, these router brands let you back up a router’s settings to a file and then load them onto a replacement router — here are the detailed migration steps for UniFi routers, which can run multiple applications. Now, all Wi-Fi and network settings will remain the same.
In this case, keep the following in mind:
- The replacement router and the old router typically require firmware of the same major release. In the case of ASUS, the former typically needs to use the same or a newer major firmware version as the latter.
- After the restoration, adjust the settings to meet the new router’s model and Wi-Fi standard. Then (also on an ASUS router), it’s a good idea to create a new backup of the router and restore it to the new router to eliminate any potentially problematic settings.
- Reset the old router to factory defaults to eliminate the risk of conflicts before giving it away.
Generally, with home-grade routers, while importing settings from an old router into a new one is convenient, it’s best to set up the new router from scratch and enter the settings manually.
With business-class routers, such as those in Ubiquiti’s UniFi product line, migrating from one router to another using the backup file is the norm and works without any issues.

The final tip
There you go. The Wi-Fi router swapping job doesn’t have to be complicated. However, the interruption is inevitable — you have to remove the old and replace it with the new — which can be a drag if you have loved ones working from home and, for some reason, you can’t wait till everyone takes a break.
You can minimize this downtime by applying all the Wi-Fi router-swapping tips above to the new hardware separately — the new router doesn’t have to be part of your network during the process. After that, once it’s ready, place it near the old router, turn it on, and wait for it to boot up fully. Then, quickly move the network cables from the old router over, starting with the WAN port.
If you time the process well, the actual downtime will be well under a minute, enough to go unnoticed by the involved parties. It can be a fun challenge. I speak from experience.
